Friday, May 6, 2016

PT 4 of 4 Sight Alignment or aiming.

The first step in our last fundamental requires us to identify our dominate eye. Your dominate eye will be the eye that you naturally aim with. The method I use to identify your dominate eye is to pick an object across the room, place your hands in a triangle over the object. Then bring your hands toward your face, while keeping your focus on the object. Whichever eye you land on is your dominate eye.

The next step is to adjust your length of pull, if able, to ensure you have proper eye relief from your optic. Every manufacturer has the recommended distance from their optics, however the usual distance is three to three and a half inches from the objective lens, or rear of the sight.

As we settle in we have to align our cheek to our stock. I use grip tape, or a pad, to mark the position of my cheek on the buttstock. This allows me to place my head in the exact same position every time, and the pad gives my head slight elevation to properly align my sights.

Final step covers two topics: Sight alignment and sight picture. When you line up your rear sight with your front sight, ensure that your front sight post remains in the center of your rear sight aperture.


Sight picture is the blurring out the back ground to focus on the front sight post. You should clearly see your front sight post against a blurry target.


Iron sights should be a tool that everyone knows how to use. If you are shooting with optics, ensure that you have something else incase your primary optic goes down. Every time we would get a new optic, or we got our equipment serviced, we would spend extra time at the range to ensure that our back up iron sights where zeroed as well as our scoped optics.

Our marksmanship programs are designed with practical application in mind. What does that mean? Shooting fundamentals expand much further than the range. The biggest applications are hunting, home defense, discipline, attention to detail and confidence.

Stay tuned to our blog for the rest of the series. Head on over to Facebook and Instagram and give us a like and follow. Message us today to find out when our next event is and how to schedule your training in the West Valley of Phoenix

(The above photos are standard iron sights on many AR platforms.)

Thursday, May 5, 2016

Breathing PT 3 of 4

Breathing is identifying how your respiratory pattern affects your shooting, and how to adjust your timing on when to pull the trigger. The muscles that are used when you breath naturally, will contract around your chest cavity and cause a rise and fall, vertically up and down, of your point of aim on the target.

You first must understand what a breathing pattern is and what it looks like. As we see in our diagram, we have a natural rise and fall of our chest. Note too, that we have a natural pause point. Its not for very long, but this is the point when you actually stop moving. As long as the rest of the body is relaxed or applying slight tension to the rifle for support, you will execute your trigger squeeze at that precise moment.

Now I'm not saying that you are going to just pull your trigger, no, there is a process to the end of our fundamental application that we must follow. As we are breathing, we are thinking about our sight alignment, watching as it rises and falls with our breathing. We are ensuring that our position is stable, we are ready to absorb the recoil of our rifle. 

This is usually a few deep breaths that you take through your nose and exhale through the nose or mouth. You are not holding your breath, but controlling the rate at which your heart beats, to relax the body. The last thing you do is apply your trigger squeeze, thinking about your finger placement, a squared off pull of the trigger, and whether or not you broke the trigger center mass or some where else on your target.

Now, in some real life scenarios, your heart will be racing, some muscles might start shaking as your adrenaline kicks in. This is where your breathing technique will kick in, and allow you to stay calm during the storm. Remember that practice makes perfect and that slow is smooth, and smooth is fast.

 Our marksmanship programs are designed with practical application in mind. What does that mean? Shooting fundamentals expand much further than the range. The biggest applications are hunting, home defense, discipline, attention to detail and confidence.

Stay tuned to our blog for the rest of the series. Head on over to Facebook and Instagram and give us a like and follow. Message us today to find out when our next event is and how to schedule your training in the West Valley of Phoenix.
(image insert)http://www.normalbreathing.com/patterns-normal.php ( they have a great video at the linked website on breathing patterns.)

Monday, May 2, 2016

Trigger squeeze Pt 2 of 4.

Trigger squeeze is the shooters ability to manipulate the trigger for clean, thorough shot placements. Pull to hard and you will undoubtedly shoot to the left or right of center mass. Do not pull hard enough and you run the risk of anticipating the shot, and will throw the shot off target, in some instances completely missing your target.

A solid trigger squeeze will encompass two factors: Follow through and trigger finger placement. Follow through is applied that split second after you pulled the trigger and the round has been fired. Finger placement, in my opinion, is entirely on what the shooter feels comfortable with.

What is follow through?  Once you have decided to pull the trigger the next though on your mind as you are squeezing the trigger. After the round has been ignited it has a split second travel down the barrel, part of a process called internal ballistics.

It is during this time, that you must remain behind your weapon, finger with the trigger completely depressed. As a rule of thumb, after you pull the trigger, press and hold for one second, then slowly release your trigger, listening for the metallic click of the hammer resetting.

For finger placement we recommend that you start with placing your trigger finger on the trigger, just about 1/4" from the first joint. Ensure that it is placed flat on the trigger, utilizing a slow squeeze reward, allowing the shot to surprise you. Never anticipate.


Years of training on the basic fundamentals have lead me to perceive follow through as the single most important factor in a first round hit. It seems slow at first, but something you should get used to hearing in the beginning is "slow is smooth, smooth is fast". All the professionals started with the basics, and become so proficient at the application of basic technique, that it appears to be advanced techniques.

Our marksmanship programs are designed with practical application in mind. What does that mean? Shooting fundamentals expand much further than the range. The biggest applications are hunting, home defense, discipline, attention to detail and confidence.

Stay tuned to our blog for the rest of the series. Head on over to Facebook and Instagram and give us a like and follow. Message us today to find out when our next event is and how to schedule your training in the West Valley of Phoenix.

Sunday, May 1, 2016

Steady Position PT 1 of 4

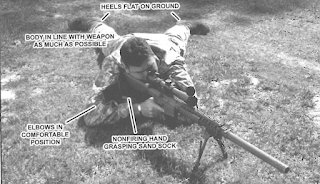
The first fundamental that we need to cover is a steady position. This is the base of our entire shooting platform. Every other fundamental works around our base, and without it we will ultimately miss the shot.

A strong position incorporates several factors: Body position (Prone, Kneeling, Standing, obstacles.), weapon position, weapon type and ability to identify your natural point of aim. We will work in the prone position with a rifle, as it is the most basic.

Lay down flat on the ground behind your weapon. Maintain a straight line behind your weapon. Legs spread apart roughly shoulder width apart with heels on the ground. This is to allow your body to absorb and disperse that energy from the weapon . You should be up on the elbows slightly, not to much or you will start to force fatigue to set in rather quickly.


I teach to support the weapon on a rest, a sand bag or a range bag, initially. This is designed to give the shooter confidence in a solid platform, and show how your muscles play an impact on your overall shooting. The non firing hand, initially, adds to much movement to your rifle and is not needed for accurate shots.

Weapon should be grasped firmly with the firing hand on the pistol grip, pulling it firmly into the shoulder. It should be a firm grip, not a white knuckle grip. Grip to hard, and fatigue will set in. Grip to light and your weapon will bounce around.

Ultimately the shooting position becomes shooters preference. Build a solid platform with our basics, then start to adjust your position to find what fits best for you. Their are hundreds of techniques out there on this, all of them will work if you apply the basics to them.

This is the same technique I adopted when I was a student at the United States Army Sniper School. I further expounded upon this technique after I became an instructor with Sniper School. When I became a Drill Sergeant I was able to fundamentally change my units shooting SOP, which resulted with the highest Rifle Marksmanship Qualifications in my Battalion.

Our marksmanship programs are designed with practical application in mind. What does that mean? Shooting fundamentals expand much further than the range. The biggest applications are hunting, home defense, discipline, attention to detail and confidence.

Stay tuned to our blog for the rest of the series. Head on over to Facebook and Instagram and give us a like and follow. Message us today to find out when our next event is and how to schedule your training in the West Valley of Phoenix.